BipedPlus
Ep.1 — Preset · Biped Style · Build Tab
Download Markdown Download with Images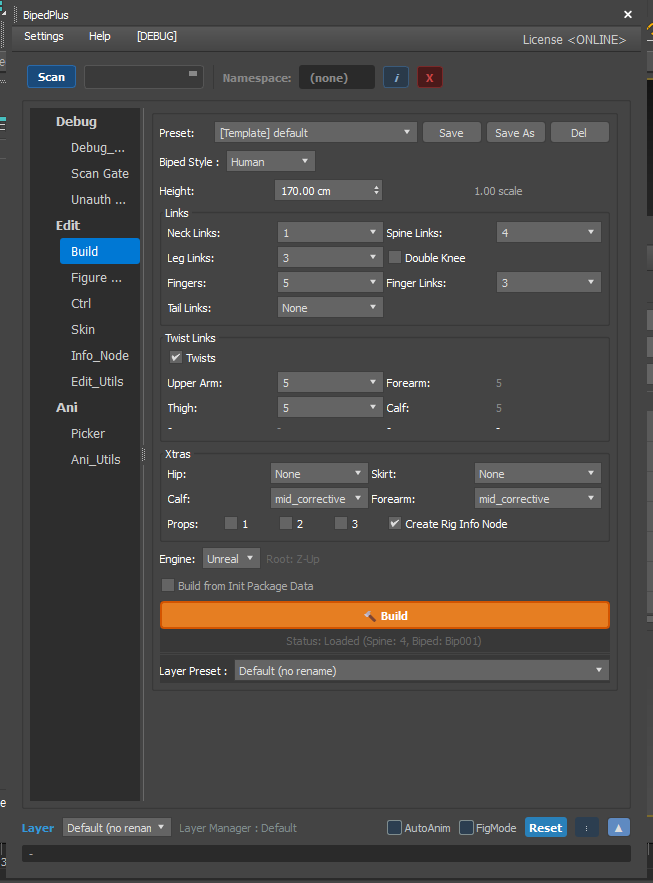
Overview
This is the process of setting up the basic rigging skeleton in the Build tab after launching BipedPlus for the first time and creating it with Build.
Preset, Human/Beast type, and options such as Spine, Twist, Hip, and Prop are all configured at once.
Prerequisites
- BipedPlus is installed in 3ds Max and attached as a panel
- Example character mesh (video: Mabel) or your own project character
Build tab = The settings screen used when first creating a rig. Here you choose options and press the Build button to generate bones and controllers.
Step-by-Step Guide
1. Preset
- Check the Preset area at the top of the Build tab.
- Save frequently used option combinations per production with Save or Save As.
- When switching to another project, load the saved Preset to switch quickly.
- The video proceeds with default values.
2. Biped Style (Human / Beast)
| Type | Use |
|---|---|
| Human | Standard humanoid character |
| Beast | Animal type — different structure with 4 Leg Links, etc. |
- Select Human or Beast according to the character type.
- For Beast, preview in a new scene to verify the full structure (4 leg links, etc.), then choose the type that fits the target character.
- The example character (Mabel) uses Human + height 170 (adjust as needed; can also be reset in Figure Mode).
3. Build Option Settings
Spine · Leg · Finger
- Spine: Number of Biped spine bones
- Leg Link: Default 3 (Thigh–Knee–Foot, etc.)
- Finger: 5, confirm link count
Twist
- Default 3 — 3 for Upper Arm and 3 for Forearm each, relative to the elbow
- 3 recommended for subculture and console-level games (Wuthering Waves, Genshin Impact, etc.)
- When Leg Link is 4 (Beast), Horse Link also gets 3 added per side
Hip · Extra (6-Dart)
- When the Hip is raised, 6 small controllers that correct the surrounding area so the skirt and waist don't look awkward are created. (Called "6-Dart" in the video.)
- For skirt characters, simply enable the skirt option.
Corrective
- Knee and elbow Corrective bones — naturally corrects to about 45° when arms and legs bend 90°
- Recommended to check by default
Prop
| Count | Result |
|---|---|
| 1 | One side |
| 2 | Both sides |
| 3 | Both sides + center |
Example character has no weapons → uncheck all
Rigging Info
- Whether to create a configuration block containing information needed for mirror, default pose, and reset.
- Recommended to check (create) — connects to the mirror and reset functions in Ep.9–14.
Engine
| Engine | "Up" direction |
|---|---|
| Unreal | Z-axis up |
| Unity | Y-axis up |
Why it matters: Set this to match the game engine your team uses so the character doesn't end up lying down or flipped when exporting via FBX, etc. (Example: Unreal)
Init Package
- An option that determines whether to use previously saved joint placement from Figure Mode (Ep.2–3) as-is when Building.
- For the first Build, there is no saved data yet, so uncheck — create without Init.
4. Running Build
- Review the options one more time.
- Press the Build button. (In the video, Build is done after confirming defaults.)
- After completion, verify that bones and controllers have appeared in the viewport. — It is normal if the position doesn't match the mesh yet. You'll align them in Ep.2 Figure Mode.
Concept Reinforcement
- Tail Link is planned to be added in a future update.
- Build options are the same as Biped Figure options, but BipedPlus has them organized in a more readable layout.
- Even though the UI may look like a lot, the actual flow is just set options → Build once.
Notes
- When switching between Beast/Human, the Leg Link and Horse Link structure changes. Finalize the character type first.
- The Engine setting must match the export axis. Check your project's conventions.