BipedPlus
Ep.4 — Controller Creation · Biped Shape · Mirror & Naming
Download Markdown Download with ImagesOverview
After Figure Mode, the Ctrl panel covers controller shape, color, bone display, create/naming, and curve scale/mirror.
The Ctrl panel has three sub-tabs — this guide follows that order.
| Sub-tab | What it does |
|---|---|
| Ctrl | Shape palette, Offset/Ctrl naming, Create Mode, Curve Transform, curve Mirror |
| Color | Max / Maya L·C·R color presets |
| Bone | Bone Width/Height/Fin, Bone/Box Mode, Mirror |
Prerequisites
- Build + Figure Mode (Init) complete
- Joint positions re-aligned in Figure Mode if needed
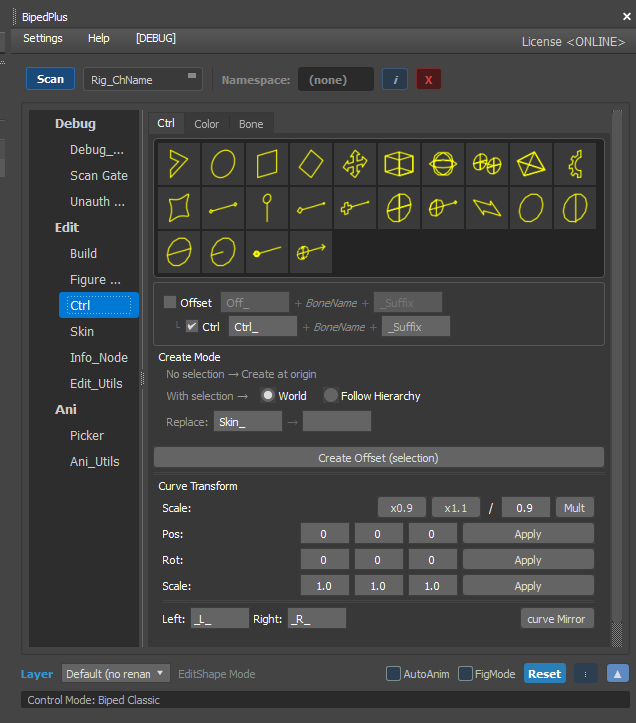
1. Ctrl tab — Shape · Naming · Create · Curve
After Build, refine controller position/shape, create new controllers, and bulk-scale/mirror curves here.
If controller display (flags) drift after Figure Mode edits, re-align them in this tab.
Shape palette
- Pick shape presets from the yellow wire icons at the top.
- You can also build a custom shape (later in the video).
Naming (Offset / Ctrl · Prefix · Suffix)
- Use Offset / Ctrl checkboxes plus Prefix/Suffix (e.g.
Ctrl_+ BoneName). - Keep Left / Right (
_L_/_R_) consistent for Mirror and Picker. - Changing only the prefix can rename both sides in bulk — see the video.
Create Mode
| Situation | Behavior |
|---|---|
| Nothing selected | Create at world origin |
| With selection | Create at selection — World / Follow Hierarchy |
| Offset | Create at an offset from selection |
| - Hide the character first to test empty-scene creation. | |
| - Selected + Offset supports group place/rotate. | |
- Replace (Skin_ → …) remaps skin-bone naming on create. |
Curve Transform · curve Mirror
- NURBS curves bundle source/curve/points — scaling only in Max can be slow.
- Use bulk scale (x0.9 / x1.1) and Pos/Rot/Scale Apply.
- Match the other side with curve Mirror or after Flip.
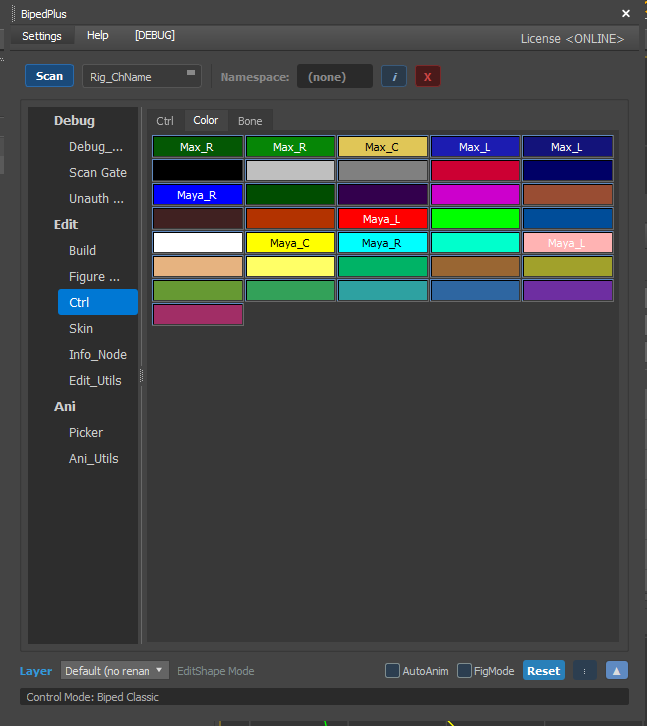
2. Color tab — Color presets
Quickly set controller wire colors.
- Presets like Max_L / Max_C / Max_R and Maya_L / Maya_C / Maya_R are laid out in a grid.
- Split colors by left/center/right (or team rules) so sides are obvious in the viewport.
- Pick a Max- or Maya-style standard for the production and apply it consistently.
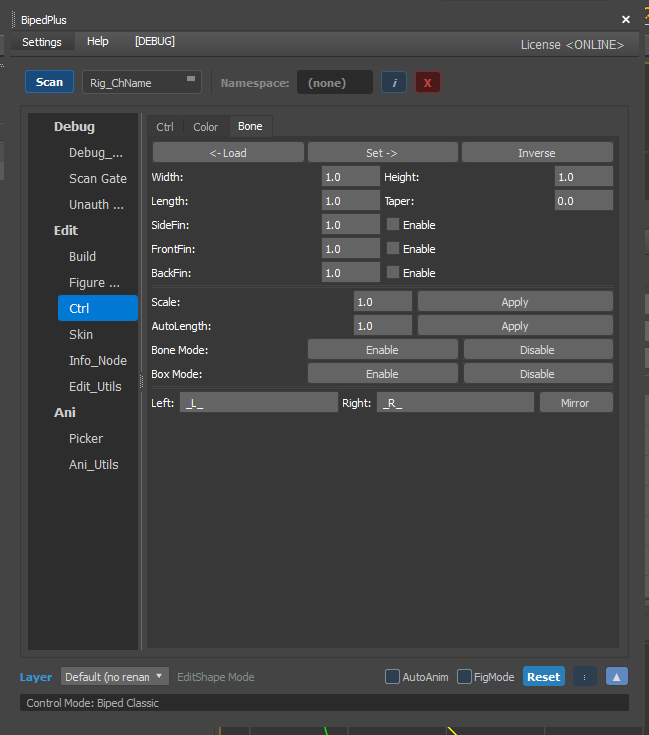
3. Bone tab — Bone display
Controls display size/shape of skin bones (not a weight-paint screen).
| Item | What it does |
|---|---|
| ← Load / Set → / Inverse | Load, apply, or invert display settings on the selection |
| Width · Height · Length · Taper | Bone box size and taper |
| Side / Front / Back Fin | Fin display On/Off and size |
| Scale / AutoLength Apply | Apply scale / auto length |
| Bone Mode / Box Mode | Enable/Disable bone or box mode |
| Left / Right · Mirror | Set L/R suffixes, then Mirror |
If bones look too big/small in the viewport, clean them up here first.
4. Biped Shape editing (EditShape Mode)
Not a sub-tab — enable EditShape Mode at the bottom to edit Biped controller shape vertices.
- Enter EditShape Mode / Biped Shape editing.
- Move vertices to adjust controller size and form.
- Press Update to apply the shape.
- Other side: edit in Flip mode → use R to find the matching Left/Right name and confirm both sides update.
Concept reinforcement
- The Ctrl panel is the "polish visuals + team naming" phase — the rig skeleton is already set in Build/Figure.
- Teams often alternate joint tweaks in Figure Mode with shape/color/bone display work in Ctrl.
Notes
- Don’t forget Update after Biped Shape edits.
- Editing one side without Flip makes L/R shapes diverge.
- Keep naming/color rules aligned with production standards for Picker, Mirror, and export.