BipedPlus
Ep.8 — Picker · Custom Picker Setup
Download Markdown Download with Images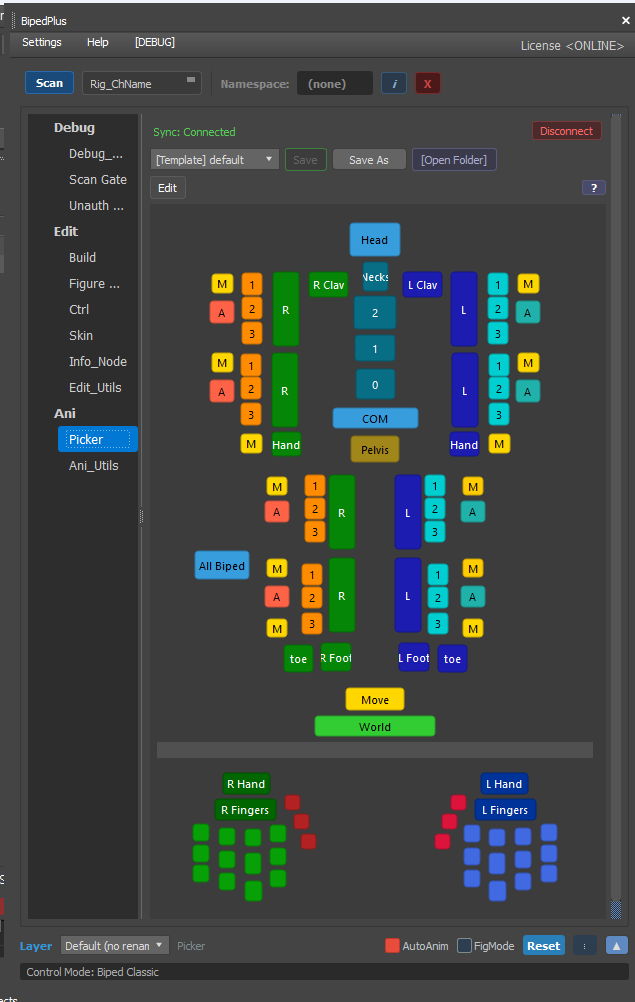
Overview
Picker = A UI that lets you quickly select controllers via buttons, without hunting for them one by one in the viewport.
The BipedPlus Picker tab handles everything from creation, connection, to saving.
Prerequisites
- Build through Controller steps complete
- Figure Mode is OFF (animation / rigging work mode)
- The Picker window may open large at first — resize it to fit your monitor
Step-by-Step Guide
1. Open Picker · Scan
- Open the Picker window from the Picker tab.
- Scan — reads the BipedPlus rig from the scene to activate the button areas.
→ Without scanning, the window may be empty or buttons may not respond. - Drag the window corner to resize.
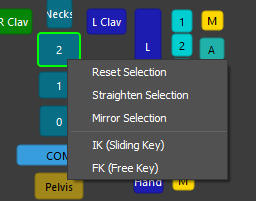
2. Button Right-Click Menu (Anim Mode)
Right-click a Picker button to open actions for the current selection.
The menu has two groups: Pose / Selection and Key Type (Biped).
Pose / Selection
| Menu | What it does |
|---|---|
| Reset Selection | Resets selected controllers/bones to the default pose. Same family as Ani Utils Reset Selection. |
| Straighten Selection | Straightens the selection along the parent rotation axis (e.g. fingers, arm joints). |
| Mirror Selection | Mirrors the current pose to the opposite side (L↔R). Direction is inferred from the selection side. |
Key Type (Biped only)
Items below the separator appear only on biped / biped_nub / group buttons.
Same behavior as Ani Utils IK (Sliding Key) / FK (Free Key).
| Menu | What it does |
|---|---|
| IK (Sliding Key) | Sets a Sliding Key on the selected Biped — IK keys that allow the foot/hand to slide on the contact surface. |
| FK (Free Key) | Sets a Free Key — FK keys for free motion. |
Left-click = select · Right-click = this menu. Use in Anim mode with Connect OFF.
3. Connect / Disconnect — Link Buttons to Controllers
- Turn on Connect mode.
- Drag a controller from the viewport onto a Picker button to link them.
- After connecting, turn off Connect and press the button to select that controller.
- Disconnect — unlinks a button.
If you press a button while Connect is still on, selection may not work — test after turning Connect OFF.
4. Template vs Edit Mode
| Mode | Description |
|---|---|
| Template | Default provided layout — adjust position only slightly |
| Edit | Freely add/remove buttons, resize, set background |
To modify a template (important):
- "Save As" — copy the original.
- Switch to Edit mode.
- Save under a team/test name and then edit.
→ Do not directly overwrite the original template.
5. Adding Buttons · Aligning · Mirroring
- Edit mode → add buttons via Add Button, etc.
- Example of placing 3 buttons vertically (video).
- Align — spacing and line alignment.
- Mirror — symmetrical left/right placement on the Picker UI.
- Save / Update → press buttons in animation mode to confirm selection works.
6. Background Image
- Adding a character silhouette image as the background makes it easy to intuitively place buttons at shoulder, hand, and leg positions.
7. Using with Ani Utils
- Keeping Picker + Ani Utils docked next to Max creates a seamless flow of
select via button → Key → Mirror.
Tips
- After changing the rig structure (adding custom controllers, changing Build options) → Scan again.
- If bone count changed (e.g., Twist to 5), match the Picker preset to Ep.3 settings.