FAQ.2 — Manual install when .mzp auto-install fails
Download Markdown Download with ImagesOverview
| Item | Details |
|---|---|
| Use when | .mzp auto-install fails / Permission denied persists |
| Method | Query paths in Max → copy files manually |
| Try first | If possible, try FAQ.1 — Permission denied / scripts write access on install first |
| Images | 04–14 (path lookup → copy / Macro registration / launch) |
Version notes (important)
- Max 2025 and later: The menu registration file in
startup(os_bipedPlus_menu.ms) is required. - Max 2024 and earlier: The menu
.ms(_register_menu.ms→os_bipedPlus_menu.ms) may be missing or unnecessary.
→ In that case you may skip copying the menu.ms.
→ Still register the path scriptos_bipedPlus_path.ms(_register_path.ms) when possible.
0. Prepare the package (unzip .mzp)
- Get the
.mzpfor your Max version
(e.g.biped_plus_v2_2_3_max2025.mzp) - Rename a copy to
.zipand extract
(or open the.mzpdirectly with an archive tool) - After extraction it should look like this:
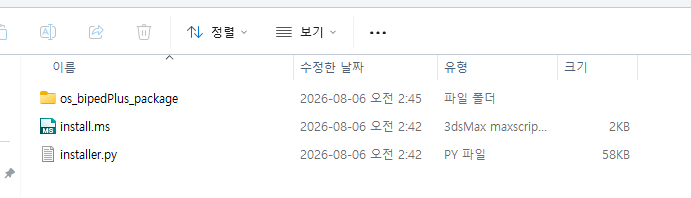
The screenshot shows the result of extracting the
.mzpfile.
You should see theos_bipedPlus_packagefolder,install.ms, andinstaller.py.
Structure summary:
(extracted)/
├── install.ms
├── installer.py
└── os_bipedPlus_package/
    ├── os_bipedPlus/
    ├── _register_menu.ms   ← Max 2025+ (may be absent on 2024 and earlier → skip OK)
    ├── _register_path.ms
    └── ...
1. Look up install paths in 3ds Max
The key to manual install is confirming your PC's exact paths first.
- Launch the matching Max version
F11→ MAXScript Listener- Run:
format "userScripts = %\n" (getDir #userScripts)
format "userStartup = %\n" (getDir #userStartupScripts)
format "userMacros  = %\n" (getDir #userMacros)
- Paths are printed in the Listener.
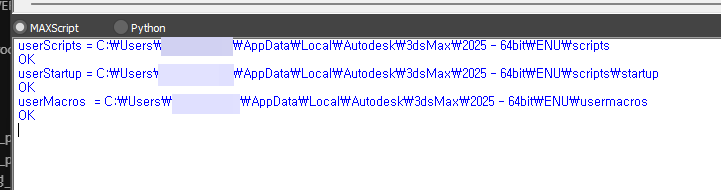
The screenshot shows script output in 3ds Max.
Success whenuserScripts/userStartup/userMacrospaths appear withOK.
Account names in the path differ per PC; examples useusername.
Typical text output:
userScripts = C:\Users\username\AppData\Local\Autodesk\3dsMax\2025 - 64bit\ENU\scripts\
userStartup = C:\Users\username\AppData\Local\Autodesk\3dsMax\2025 - 64bit\ENU\scripts\startup\
userMacros  = C:\Users\username\AppData\Local\Autodesk\3dsMax\2025 - 64bit\ENU\usermacros\
- Note the actual printed paths, then quit all Max instances
Do not copy paths from this guide — use only what the Listener prints.
2. Copy the tool folder (mzp → scripts)
Copy the os_bipedPlus_package folder from inside the .mzp into 3ds Max's scripts folder (userScripts).
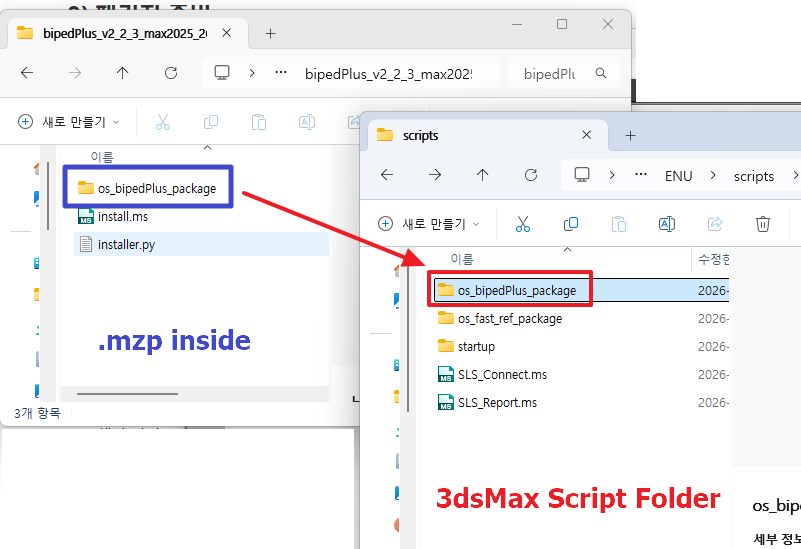
Left: extracted
.mzpfolder (.mzp inside)
Right: 3ds Maxscriptsfolder (userScripts)
Copy onlyos_bipedPlus_packageas shown by the arrow. (install.ms,installer.pyare not required.)
| Source | Destination |
|---|---|
(extracted)\os_bipedPlus_package\ |
(userScripts)\os_bipedPlus_package\ |
If os_bipedPlus_package already exists, back it up or delete it before copying.
Verify after copy:
(userScripts)\os_bipedPlus_package\os_bipedPlus\
(userScripts)\os_bipedPlus_package\_register_menu.ms
(userScripts)\os_bipedPlus_package\_register_path.ms
3. Register menu/path scripts in startup
3-1. Open scripts\startup
Inside the userScripts folder from the Listener (...\ENU\scripts), open the startup subfolder.
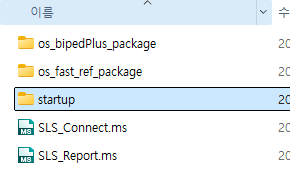
If there is no
startupfolder, create one.
(Name exactly:startup)
This path is the Listener's userStartup.
3-2. Copy files and rename
Copy the files below from os_bipedPlus_package into startup, then rename them:
| Source (in package) | Target name (in startup) | Notes |
|---|---|---|
_register_path.ms |
os_bipedPlus_path.ms |
Recommended (all versions) |
_register_menu.ms |
os_bipedPlus_menu.ms |
Max 2025+ / may skip on 2024 and earlier |
Max 2024 and earlier:
_register_menu.ms/os_bipedPlus_menu.msmay be missing or use a different menu setup.
If absent, skip the menu.ms(registerpath.msonly).
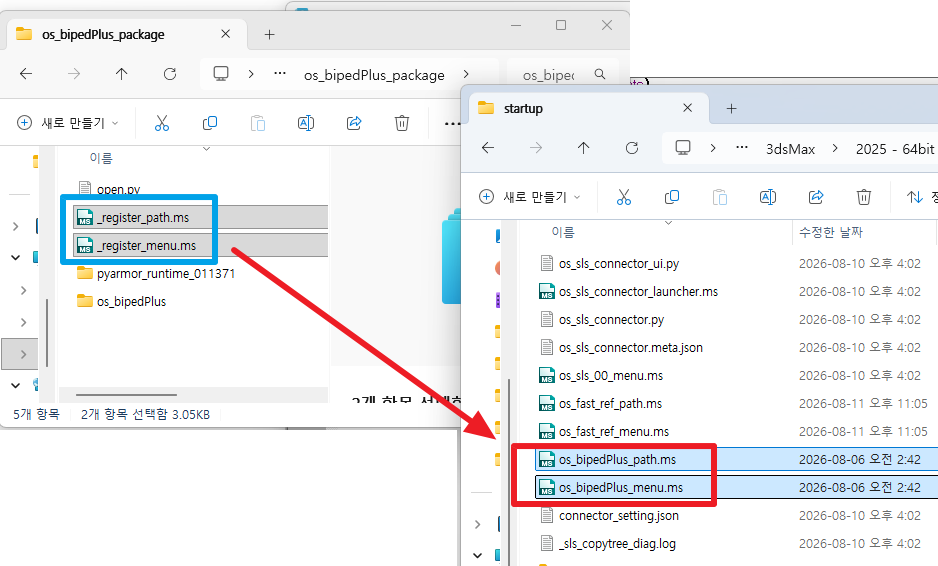
Left:
_register_path.ms,_register_menu.msinside the package
Right:os_bipedPlus_path.ms,os_bipedPlus_menu.msinstartup
Renaming is required for registration on Max startup.
(On 2024 and earlier without menu.ms, registerpath.msonly.)
If files with the same name already exist, delete or back them up before overwriting.
If you get permission errors here → fix scripts permissions first via FAQ.1 — Permission denied / scripts write access on install.
4. Restart Max → run via Macro
Verify manual install with the Macro first, not the menu.
(There is no .mcr inside the .mzp, so create the Macro in the Listener/editor.)
4-1. Run the Macro creation script
- Restart Max
- Paste the script below into the Scripting Editor or Listener (
F11) and run it.
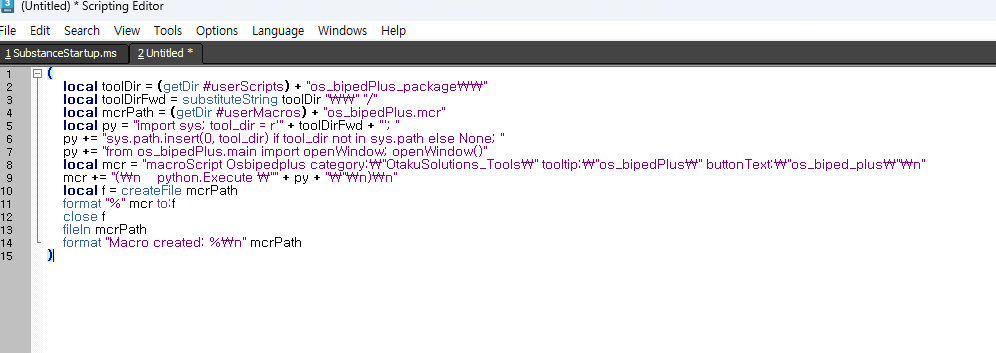
Paste the Macro creation script into the Scripting Editor and run it.
(
    local toolDir = (getDir #userScripts) + "os_bipedPlus_package\\"
    local toolDirFwd = substituteString toolDir "\\" "/"
    local mcrPath = (getDir #userMacros) + "os_bipedPlus.mcr"
    local py = "import sys; tool_dir = r'" + toolDirFwd + "'; "
    py += "sys.path.insert(0, tool_dir) if tool_dir not in sys.path else None; "
    py += "from os_bipedPlus.main import openWindow; openWindow()"
    local mcr = "macroScript Osbipedplus category:\"OtakuSolutions_Tools\" tooltip:\"os_bipedPlus\" buttonText:\"os_biped_plus\"\n"
    mcr += "(\n    python.Execute \"" + py + "\"\n)\n"
    local f = createFile mcrPath
    format "%" mcr to:f
    close f
    fileIn mcrPath
    format "Macro created: %\n" mcrPath
)
- Success when the Listener shows
Macro created: ...os_bipedPlus.mcrandOK.

When you see the
usermacros\os_bipedPlus.mcrpath andOK, Macro registration is complete.
Account names in the path differ per PC; examples may showUsername.
4-2. Add the Macro to a toolbar in Customize
- Top menu Customize → Customize User Interface...
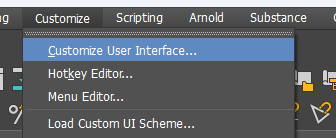
- Toolbars tab → Category:
OtakuSolutions_Tools - Find
os_bipedPlusin the Action list.
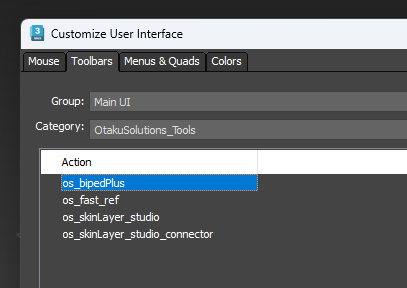
- Drag
os_bipedPlusonto a toolbar to create a button.
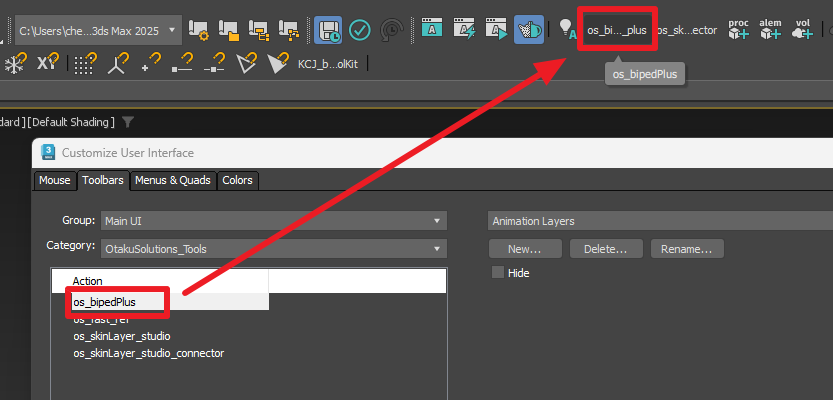
Drag the
os_bipedPlusaction onto the main toolbar to create a button.
Hovering shows tooltipos_bipedPlus.
- Click the toolbar button and confirm the window opens.
Macro button launch is the primary verification — not the OS Tools menu.
5. (Optional) Menu check — Max 2025 and later
If the Macro runs, installation is complete.
Check the menu only if you want to use it as well.
- Confirm
os_bipedPlusappears in the menu (usually OS Tools) - If missing, run in the Listener:
fileIn ((getDir #userStartupScripts) + "os_bipedPlus_menu.ms")
Max 2024 and earlier: Skip this section if you did not register the menu
.ms.
6. Final verification — normal launch
Click the toolbar os_bipedPlus button. If the BipedPlus window opens as below, manual install is complete.
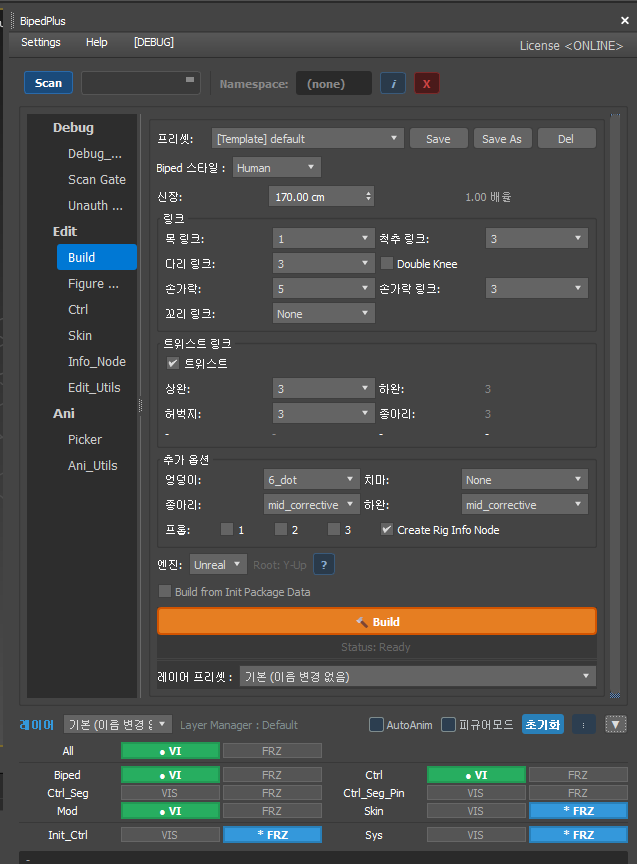
Normal when the window opens with
Status: Ready,License <ONLINE>, etc.
(License/UI details may vary slightly by version and environment.)
Checklist
- [ ] Verified .mzp extraction (see
os_bipedPlus_package) - [ ] Queried paths in Max Listener
- [ ] Copied
os_bipedPlus_packageinto scripts (userScripts) - [ ] Confirmed
scripts\startupfolder (create if missing) - [ ] Registered
_register_path.ms→os_bipedPlus_path.ms - [ ] (2025+) Registered
_register_menu.ms→os_bipedPlus_menu.ms/ menu ms optional on 2024 and earlier - [ ] After Max restart, ran Macro creation script (
os_bipedPlus.mcr) - [ ] Placed toolbar button in Customize and verified Macro launch
- [ ] (Optional, 2025+) Checked menu /
fileInmenu.ms if needed - [ ] BipedPlus window opens normally from toolbar button
Note — temporary workaround / remote support
This manual install guide is a temporary workaround when auto-install fails.
For root-cause diagnosis and a permanent fix, contact OtakuSolutions —
we can investigate via remote support.
Contact: https://otakusolutions.com/en/contact
OtakuSolutions