F04 — Skin Desk · Sync Map
Download Markdown Download with ImagesSkinLayer Studio 1.3.x Standalone UI reference.
Practice: EP00–EP12 · Features: F01–F17 (order 50+).Describes the lower-left Skin Desk (mesh list) and Sync Map (source↔target graph) from screenshots.
For overall UI placement, see #5 in the UI layout guide.
1. Skin Desk — mesh workbench
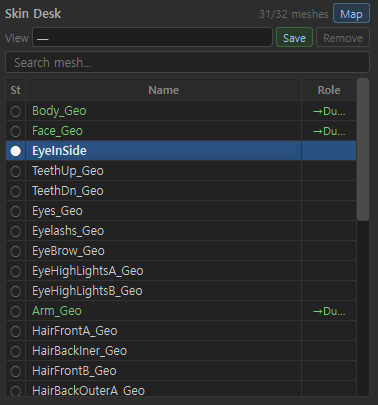
| Item | Description |
|---|---|
| Skin Desk | List of meshes (slots) loaded into Studio |
| N/M meshes | Shown / total mesh count (e.g. 31/32 meshes) |
| Map (blue button) | Open Sync Map window |
| View | List filter / view mode |
| Save / Remove | Save selected mesh · remove from list |
| Search mesh... | Search by name |
List columns
| Column | Meaning |
|---|---|
| St | Status / selection marker (circle icon) |
| Name | Mesh name |
| Role | Sync role · link cue (e.g. → Du… = linked to a Dummy source) |
Name colors (role hints)
| Display | Meaning |
|---|---|
Green name + Role → Du… |
Sync Target — mesh linked to some Source (Dummy, etc.) |
| White name | Normal mesh (no Sync Role yet, or unlinked) |
| Blue row | Currently selected mesh |
A common flow sets a full-body dummy (
Dummy_Body, etc.) as Source and clothing/part Geo as Target.
2. Skin Desk right-click menu
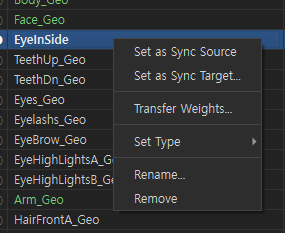
Right-click a mesh row to open Sync / transfer menus.
| Menu | Action |
|---|---|
| Set as Sync Source | Set this mesh as Sync Source |
| Set as Sync Target... | Set as Sync Target (follow-up UI to pick source, etc.) |
| Transfer Weights... | Weight transfer dialog |
| Set Type > | Mesh type submenu (e.g. Dummy) |
| Rename... | Rename |
| Remove | Remove from Skin Desk |
3. Sync Map — relationship window
Open with Skin Desk Map (or the menu).
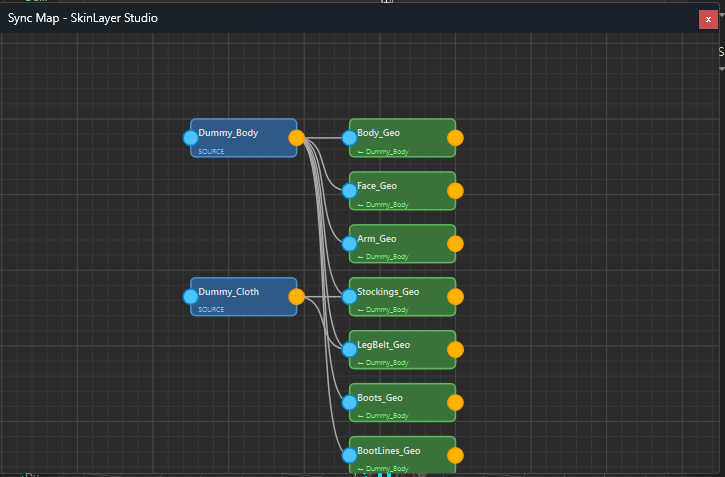
Blue node = Source, green node = Target, line = Sync link.
How to read nodes
| Color | Role | On-screen examples |
|---|---|---|
| Blue node | SOURCE | Dummy_Body, Dummy_Cloth |
| Green node | Target (Geo) | Body_Geo, Face_Geo, Boots_Geo … |
Green node subtitle ~ Dummy_Body |
Hint of currently linked Source name | |
| Gray line | Source → Target Sync link |
Example reading (screen above)
Dummy_Body→Body_Geo,Face_Geo,Arm_Geo,Stockings_Geo, … (body/clothing broadly)Dummy_Cloth→Stockings_Geo,LegBelt_Geo,Boots_Geo,BootLines_Geo(clothing · boots side)
One Target can link to multiple Sources (e.g. boots to both Body + Cloth).
4. Sync Map right-click menu
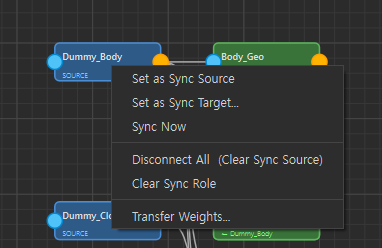
Right-click a node (or selection) for Sync operations.
| Menu | Action |
|---|---|
| Set as Sync Source | Set as Source |
| Set as Sync Target... | Set as Target |
| Sync Now | Sync now from linked Source → Target |
| Disconnect All (Clear Sync Source) | Clear all Source-side links |
| Clear Sync Role | Remove Sync role |
| Transfer Weights... | Weight transfer |
Skin Desk and Sync Map menus share the same Sync concepts. Desk shows Role in the list; Map shows links as lines.
Recommended flow
1) In Skin Desk, select dummy / full-body mesh
2) Right-click → Set as Sync Source
3) Select clothing / part mesh → Set as Sync Target...
4) Confirm links in Map (blue→green lines)
5) Sync Now to sync layer/weight relationships
6) Transfer Weights... for finer transfer if needed
7) Apply to Skin
Related docs
| Doc | Contents |
|---|---|
| UI layout guide | Full screen · Skin Desk = #5 |
| Layers panel details | Layer editing |
| Create Dummy · Transfer Weights | Create dummy → Transfer practice |
| Practice EP05 Merge & Transfer | Transfer Weights practice |
| Practice EP06 Sync / Fallback | Sync Now · Fallback |
Images: skin_desk_overview.png · skin_desk_context_menu.png · sync_map_overview.png · sync_map_context_menu.png
Written: 2026-07-26