Ep.1 — Installation and DCC Connection
Download Markdown Download with Images1. Download
1-1. Get a subscription license
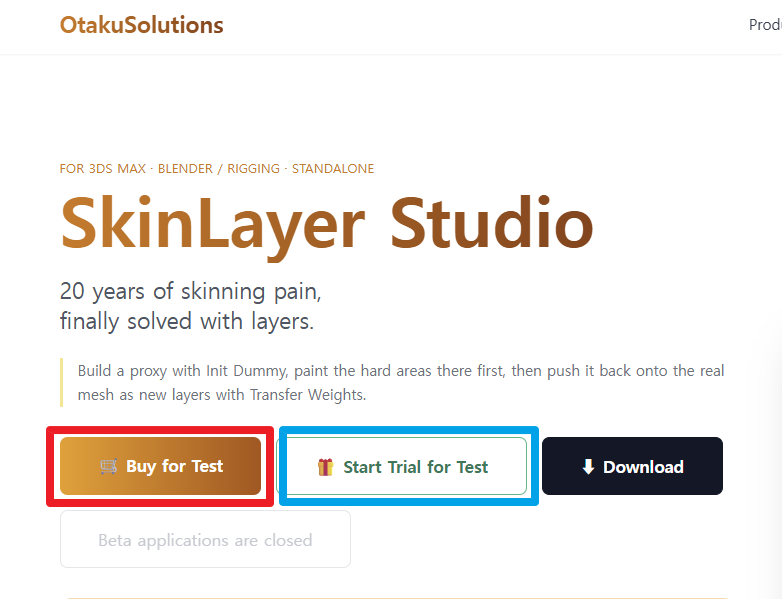
- Go to the OtakuSolutions website → SkinLayer Studio product page.
- Use Buy or Start Trial to obtain a subscription license.
1-2. Open My Subscription
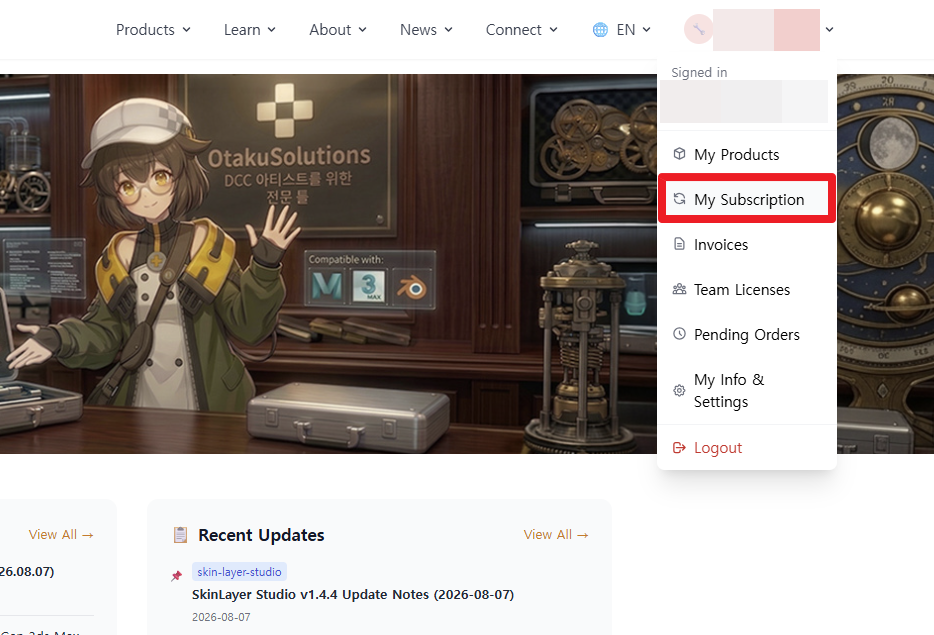
- Sign in, then open the account (profile) menu at the top right.
- Go to My Subscription.
1-3. Download from SkinLayer Studio
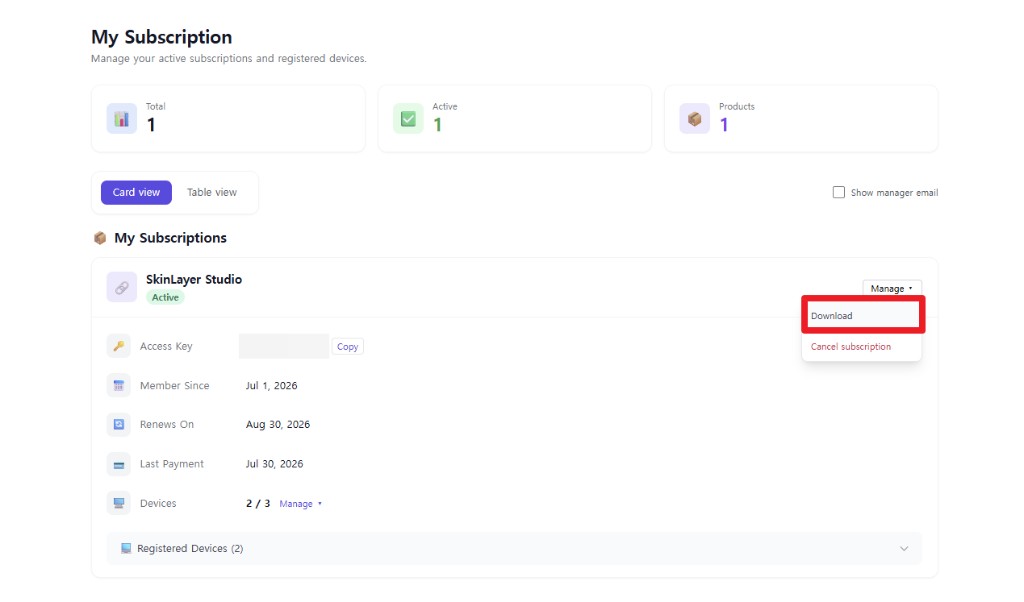
When your subscription license is issued, SkinLayer Studio appears under My Subscriptions.
- Open the item’s Manage menu.
- Click Download.
1-4. Download the installer
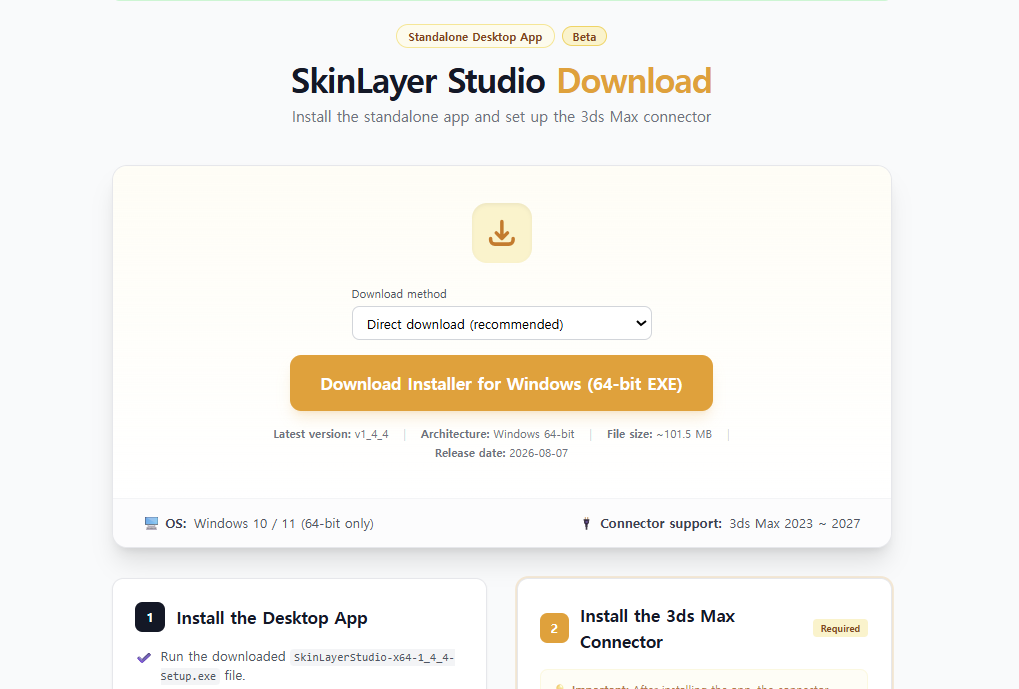
On the download page, get the latest Windows 64-bit EXE installer.
- Choose a Download method.
- Click Download Installer for Windows (64-bit EXE).
Example filename: SkinLayerStudio-x64-1_4_4-setup.exe
Download methods
| Users | Method |
|---|---|
| Korea / Global | Direct download (recommended) or Google Drive |
| China | Nutstore (坚果云) shared folder |
In China, Nutstore may be more reliable than Direct / Google Drive depending on the network. If the Nutstore card appears on the download page, use 打开坚果云文件夹 to get the latest package.

1-5. Supported Environments
| Item | Details |
|---|---|
| OS | Windows 10 / 11 (64-bit) |
| Mac / Linux | Under consideration — check homepage requirements before installing |
| 3ds Max connector | 2019–2027 (through latest) |
| Blender connector | 3.6–5.2 (through latest) |
| Maya / Unity / Unreal | Planned — currently in preparation |
2. Installation (Inno Setup)
- Run the downloaded Setup.exe.
- Select your installation language (KO / EN / JA / ZH, etc.).
- Review and accept the license agreement.
- Specify the installation path (default is fine).
- If a previous installation exists, confirm reinstall → Yes.
- Choose whether to create Start Menu and desktop shortcuts.
- Click Install → then Finish when complete.
Example installation root:
{install path}/
├── SkinLayerStudio.exe
└── os_skinLayer_studio_connector/
3. First Launch — License Activation
When you first run the app, it will be in an unlicensed state.
- The viewport will be covered by a License Lock overlay.
- Click Open License Manager to proceed.
Activation Steps
- Click Open License Manager.
- Enter your license key.
- Click Update License / Register.
- Confirm machine registration succeeded.
- Once activated, the 3D viewport becomes available.
Standalone: If activation fails, the app stays open — retry from the overlay.
4. Installing the DCC Connector
- Menu: Tools → Install Connector... (to check status only: Options → Connectors tab).
- Select your DCC (e.g., 3ds Max 2025) → Install.
- Fully close your DCC, then restart it.
The connector is a communication script that runs inside your DCC. SLS does not directly launch the DCC — it only sends commands to a running DCC, so your DCC must be open for Pick/Push to work.
If Max connector install fails with a write permission error, see FAQ.1 — Write permission guide.
5. DCC Connection · Pick · Apply to Skin
- Launch your DCC — confirm the connector loaded.
- In SLS, select your DCC from the DCC combo.
- Confirm the green indicator (connected).
- Pick — imports the skin mesh selected in your DCC.
After Pick:
- The mesh, bones, and weights appear in the viewport.
- A slot is registered in the Skin Desk / Skin Archive.
- Save with File → Save to create a .sls project.
Edit weights with layers and brushes, then use > Apply to Skin in the toolbar to Push back to the DCC.
On the first Push: Game engines (Unity, Unreal, etc.) typically limit influences per vertex to 4–8. SLS automatically clamps to 8 when Pushing. Clean up unnecessary bones in the Influence panel (Used filter) beforehand for better quality.
Auto mode: The Auto checkbox in the toolbar is OFF by default. After your first successful manual Push, a dialog may ask if you want to enable it. When ON, SLS auto-Pushes after 10 seconds of idle time (adjustable to 3–30s in Options).
6. Troubleshooting
| Symptom | Check |
|---|---|
| License overlay persists | Retry key entry and online verification in License Manager |
| DCC won't connect | Reinstall connector · restart DCC |
| No mesh after Pick | Select a skinned mesh in your DCC before clicking Pick |
| Max connector write permission error | FAQ.1 |
| Maya connector does not auto-start | FAQ.3 |
| Maya connection check log | FAQ.4 |