F07 — Influences
Download Markdown Download with ImagesSkinLayer Studio 1.3.x Standalone UI reference.
Practice: EP00–EP12 · Features: F01–F17 (order 50+).Right-side Influences window — bone (influence) list for the active layer, plus weight/mask editing.
For overall UI placement, see #8 in the UI layout guide.
Panel at a glance
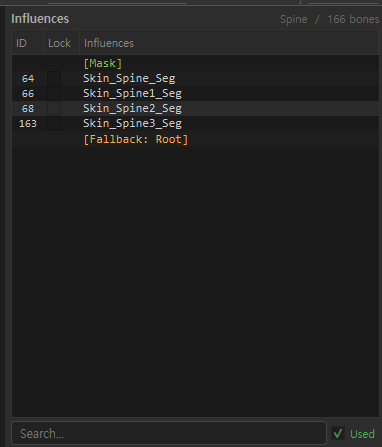
| Item | Description |
|---|---|
| Title | Influences |
| Right label | layerName / N bones (e.g. Spine / 166 bones) |
| Role | Choose paint · copy/cut target bones, Lock, Mask/Fallback |
Columns: ID / Lock / Influences
| Column | Meaning |
|---|---|
| ID | Bone number (1-based). Special rows have no ID |
| Lock | When checked, lock that bone’s weights — values kept through paint · Normalize, etc. |
| Influences | Bone name or special row ([Mask], [Fallback: …]) |
Click a bone row to select it as the viewport/paint target.
Shift = range select, Ctrl = toggle individuals (special rows excluded from multi-select).
Mask vs Weight
Weight = how much a vertex follows a bone
Mask = whether this layer affects that vertexExample: on an Arm layer, paint Mask to exclude fingertips, then paint Weight on bones.
Special rows
[Mask] (light green)
- Click → mask paint mode (view/edit mask)
- Selecting a bone exits mask mode
- Right-click menu is Mask-only (below)
[Fallback: BoneName] (orange)
Why it exists
Vertices with mask 0 or weight sum below 1 are “bound to nothing”.
Fallback absorbs that remainder so verts don’t float (often Root/Pelvis).
- Shows the Fallback bone that receives normalize · residual weights
- Clicking in Influences does not change it → change under Tools panel → Tools tab Fallback Bone
- Same concept as Fallback set at Create Skin (absorbs residual weights)
[Temp] / [Temp: …] (sky blue, right after Cut)
- Temporary hold after Cut Weight / Cut Mask
- Click to preview Temp contents
- Cleared when consumed by Paste/Replace or Clear
Used / Search
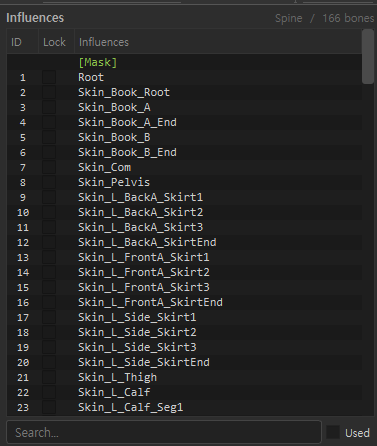
| UI | Action |
|---|---|
| Search... | Filter by bone name |
| Used | When ON, show only bones that actually have weights on the active layer |
Used ON shortens the list; OFF shows all bones registered on the Skin.
Right-click — bone (Weight)
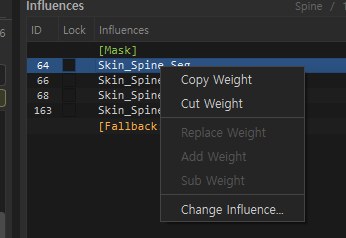
If the clipboard is empty, Replace / Add / Sub are disabled (gray).
After Copy/Cut, a (from: …) label appears.
| Menu | Action |
|---|---|
| Copy Weight | Copy selected bone’s vertex weights to clipboard (source kept) |
| Cut Weight | Move weights to Temp and set that bone’s weights to 0 (no immediate Normalize) |
| Replace Weight | Replace target bone weights with clipboard, then Normalize |
| Add Weight | Target bone += clipboard (0–1 clamp, Normalize) |
| Sub Weight | Target bone -= clipboard (0–1 clamp, Normalize) |
| Change Influence... | Merge/move selected bone weights to another bone (bone picker dialog) |
Multi-select
| Menu | Action |
|---|---|
| Copy N Weights / Cut N Weights | Batch Copy/Cut for selected bones |
| Replace/Add/Sub Weight (this row only) | Paste onto the single right-clicked row only |
| Paste All (name match) | With multi clipboard, paste onto name-matched bones |
| Change Influence... (single only) | Disabled — single selection only |
Right-click — [Mask]
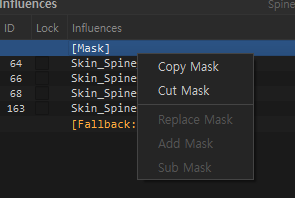
| Menu | Action |
|---|---|
| Copy Mask | Copy layer mask to clipboard |
| Cut Mask | Move mask to Temp and set mask to 0 |
| Replace Mask | Replace mask with clipboard values |
| Add Mask | Current mask + clipboard (0–1 clamp) |
| Sub Mask | Current mask − clipboard (0–1 clamp) |
Replace/Add/Sub enable only when mask or weight clipboard/Temp is present.
Clipboard strip · Clear
After Copy/Cut, a blue clipboard strip and Clear button may appear.
- Clear → empty clipboard · Temp (clean unused Cut contents)
Relationship to Hierarchy
| Influences | Bone Hierarchy | |
|---|---|---|
| Location | Fixed right panel (#8) | Viewport right drawer |
| List | Active-layer bones + Mask/Fallback | Active/Master hierarchy tree |
| Main use | Paint targets · weight/mask edit | Explore hierarchy · add bones · Rename |
Typical flow: attach bones in Hierarchy with Add to Active Mesh / + Bone, then select in Influences and paint.
→ Bone Hierarchy details
Recommended flow
1) Select the layer to edit in Layers
2) Click a bone in Influences (or use Used to see only used bones)
3) Paint weights in Paint mode
4) Move between bones: Copy/Cut → Replace/Add on another bone
   or batch move with Change Influence...
5) Mask work: click [Mask] → Copy/Cut/Replace Mask
6) Lock bones that must not change
Related docs
| Doc | Contents |
|---|---|
| UI layout guide | Influences location (#8) |
| Layers panel details | Active layer selection |
| Bone Hierarchy details | Add bones · hierarchy |
Images: influences_used.png · influences_all.png · influences_context_weight.png · influences_context_mask.png
Written: 2026-07-26