F10 — Create Dummy · Transfer
Download Markdown Download with ImagesSkinLayer Studio 1.3.x Standalone UI reference.
Practice: EP00–EP12 · Features: F01–F17 (order 50+).Typical flow: pick bones in Hierarchy → create a dummy → tidy weights on the dummy → move them to the main mesh (or another Dummy) with Transfer Weights.
For full-body · Sync strategy overall, also see practice EP05 and Skin Desk · Sync Map.
One-line summary
Select multiple bones → Create Dummy → (paint on dummy if needed)
→ Transfer Weights (Dummy → Target) → Execute
→ Lands as new layers on Target Layers
1) Select bones in Hierarchy → Create Dummy
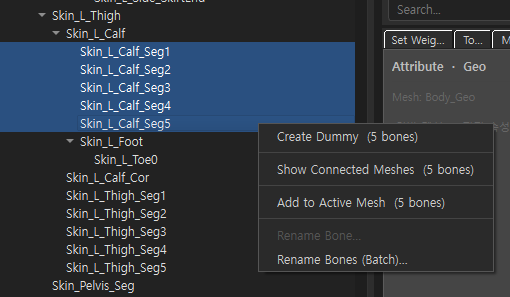
| Item | Description |
|---|---|
| Where | Right drawer Bone Hierarchy |
| Selection | Chain bones 2 or more (e.g. Skin_L_Calf_Seg1 … Seg5) |
| Menu | Right-click → Create Dummy (N bones) |
With only 1 bone, creation fails (warning). With multi-select, single Rename Bone... is disabled while Rename Bones (Batch)... stays available.
2) Create Skin Dummy dialog
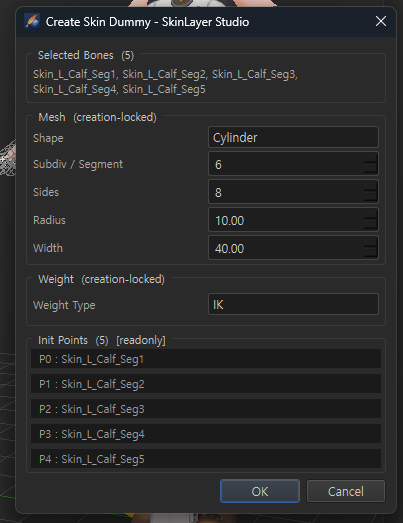
| Section | Description |
|---|---|
| Selected Bones | Bones used for creation |
| Mesh (creation-locked) | Shape(Cylinder/Strip) · Subdiv/Segment · Sides · Radius · Width — fixed at creation |
| Weight (creation-locked) | Weight Type (e.g. IK) — fixed at creation |
| Init Points [readonly] | Preview of P0… ↔ bone name mapping |
OK → a dummy slot such as Dummy_Skin_… appears in Skin Desk, with a cylinder (or Strip) mesh + initial weights matched to the selected bones.
Fine-tune after creation (Radius, etc.) in Tools → Attribute · Dummy.
→ Tools panel — Attribute
3) When the dummy appears
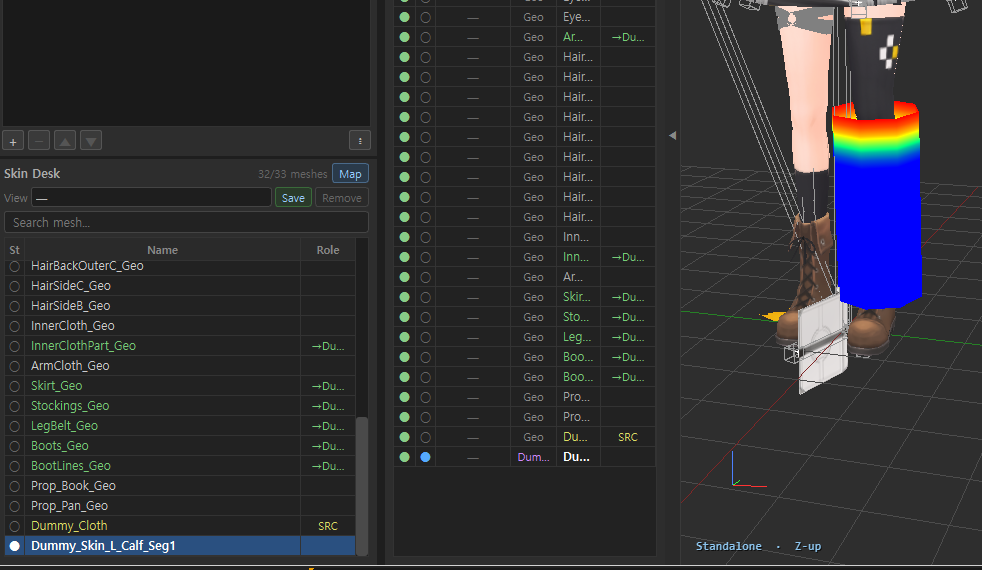
| Location | What you see |
|---|---|
| Skin Desk / Archive | Type=Dummy, name e.g. Dummy_Skin_L_Calf_Seg1 |
| Viewport | Cylinder + heatmap weights on the body part |
| Role | If other meshes use this Dummy as Source, links show as SRC / →Du… |
A dummy is a “proxy mesh for painting that region easily.” Use it when painting directly on the final main mesh is hard, then Transfer when done.
4) Move with Transfer Weights
Menu Tools → Transfer Weights... or Skin Desk / Sync Map right-click → Transfer Weights...
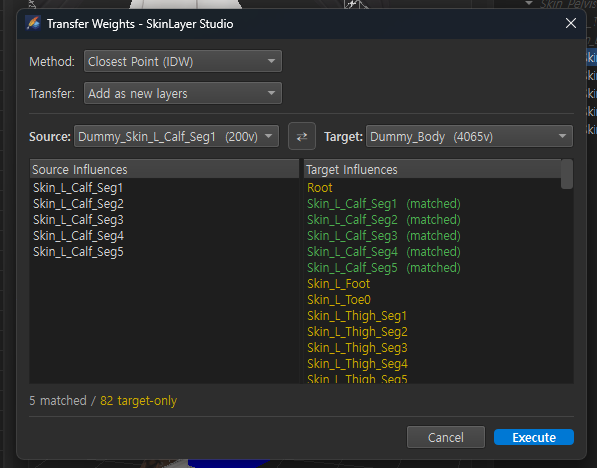
| Setting | Recommendation / description |
|---|---|
| Method | Closest Point (IDW) — transfer via nearby vertices (OK even if topology differs) |
| Transfer | Add as new layers — add as new layers on Target (does not overwrite existing) |
| Source | The dummy you just made (e.g. Dummy_Skin_L_Calf_Seg1) |
| Target | Receiving mesh (e.g. Dummy_Body, Body_Geo) |
| Influences | Green (matched) = name-matched bones · yellow = Target-only bones |
| Bottom | N matched / M target-only |
Execute → Source weights transfer to Target.
Full options · Tools menu coverage → Transfer Weights · Tools menu
5) Result — Target Layers
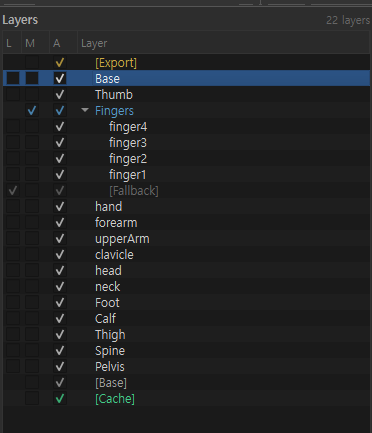
With Add as new layers, Target Layers gains layers such as Calf, Thigh.
Then refine on Target, or set as Sync Source and Sync Now onto part Geo.
Recommended practice routine (region dummies)
1) Hierarchy — multi-select Calf Seg bones, etc.
2) Right-click Create Dummy → OK (Cylinder / IK defaults often enough)
3) (Optional) Adjust Radius in Attribute · tidy dummy weights with Paint
4) Transfer Weights
     Source = Dummy_…
     Target = Dummy_Body or Body_Geo
     Method = Closest Point (IDW)
     Transfer = Add as new layers
5) Execute → check Target Layers
6) Repeat for other regions (Thigh, Arm…)
For the big picture of gathering into one full-body Sync, see practice EP05.
Related docs
| Doc | Contents |
|---|---|
| Bone Hierarchy details | Where Create Dummy lives |
| Tools panel — Attribute | Dummy Radius · Init Points |
| Skin Desk · Sync Map | SRC / →Du · Sync Now |
| Layers panel details | Layers after Transfer |
| Transfer Weights · Tools menu | Menu access · Method/Transfer · Tools items |
| Practice EP05 Merge & Transfer | Full-body dummy practice |
| EP13 — Init Dummy | Create Dummy from bones (IK / FK) |
| EP16 — Init Dummy Template | Template Apply · Fit Dummy · first-pass speed |
| EP17 — Make a Template | Build a Spine Dummy · Save Init Dummy |
| EP18 — Edit Dummy | Axes · naming · Reset Bind |
Images: dummy_create_menu.png · dummy_create_dialog.png · dummy_in_viewport.png · dummy_transfer_weights.png · dummy_transfer_layers_result.png
Written: 2026-07-26