F17 — DCC Connector (Max / Blender)
Download Markdown Download with ImagesSkinLayer Studio 1.3.x Standalone UI reference.
Practice: EP00–EP12 · Features: F01–F17 (order 50+).This feature: How to use the Connector (receiver) inside the DCC.
SLS → DCC Push: EP12. Install: EP01.
JSON Export/Import menus: F12.
1. Push vs Connector
| Path | Where | Role |
|---|---|---|
| Apply to Skin (Push) | SLS app | Daily main path — apply layer weights straight to DCC Skin |
| Connector + JSON Import | Inside DCC | Backup / workaround — recover when Push fails or is incomplete |
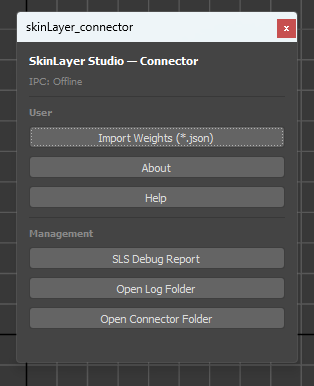
The connector lives in the DCC and talks to SLS over IPC. IPC: Listening means ready; IPC: Offline means check SLS / port.
Install via SLS Tools → Install Connector... (EP01), then fully restart the DCC.
2. For 3ds Max
2-1. Open the connector
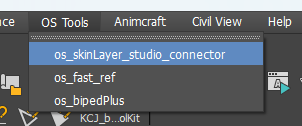
Method A — OS Tools menu (recommended)
In Max 2025+: OS Tools → os_skinLayer_studio_connector.
Method B — Toolbar button
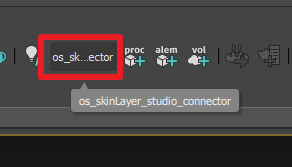
If the menu item is missing or you want a button:
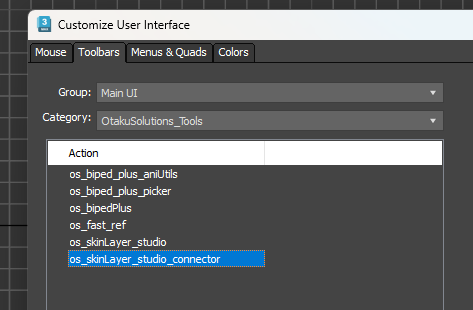
- Customize → Customize User Interface…
- Toolbars tab → Category
OtakuSolutions_Tools - Drag action
os_skinLayer_studio_connectoronto a toolbar
2-2. Connector window (User / Management)
| Section | Button | Description |
|---|---|---|
| User | Import Weights (*.json) | Opens the JSON backup plan (see 2-3) |
| User | About | Version / product info |
| User | Help | Help / docs link |
| Management | SLS Debug Report | Build a support debug report |
| Management | Open Log Folder | Open the log folder |
| Management | Open Connector Folder | Open the connector install folder |
2-3. JSON Import = backup plan (Max)
Daily work uses EP12 Push. When Push fails or some meshes are skipped:
- In SLS, export
.jsonvia F12 Export Weights (single or folder batch). - Max connector → Import Weights (*.json).
- Add weight files (.json).
- Check Target Mesh and Status=OK. (Only
Status=OKrows are applied.) - Skin Apply.
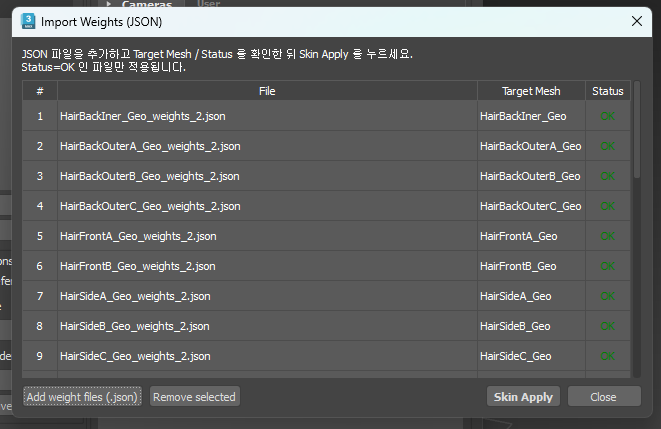
| UI | Description |
|---|---|
| Add weight files (.json) | Add JSON files |
| Remove selected | Remove selected rows |
| Skin Apply | Apply OK rows to Skin |
| Close | Close the dialog |
If Target Mesh is empty or Status is not OK: confirm a same-named mesh exists in the scene and that skin / topology / vertex count match the JSON.
3. For Blender
3-1. Open the SLS tab
In the viewport press N → sidebar tab SLS.
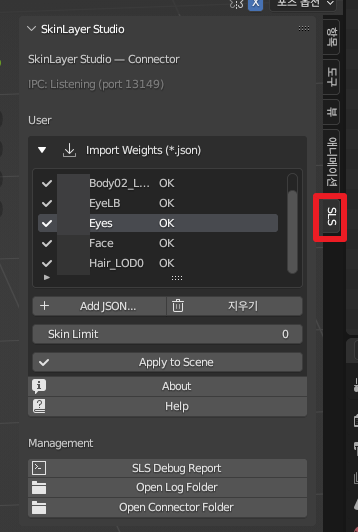
Confirm SkinLayer Studio — Connector and IPC: Listening (port …). (Port may vary by environment.)
3-2. Panel layout (User / Management)
Same roles as Max; UI is an N-panel.
| Section | Item | Description |
|---|---|---|
| User | Import Weights (*.json) list | Loaded JSON · target · status |
| User | + Add JSON… | Add weight JSON |
| User | Clear | Clear the list |
| User | Skin Limit | Influence bone limit (often 0 ≈ no practical limit) |
| User | Apply to Scene | Apply Status=OK items to the scene |
| User | About / Help | Info · help |
| Management | SLS Debug Report | Support report |
| Management | Open Log Folder | Log folder |
| Management | Open Connector Folder | Connector folder |
3-3. JSON Import = backup plan (Blender)
- Export JSON from SLS (F12).
- Blender SLS tab → + Add JSON….
- Confirm each mesh shows OK.
- Apply to Scene.
The main path remains SLS Apply to Skin (Push) (EP12).
4. Troubleshooting
| Symptom | Check |
|---|---|
IPC: Offline |
Is SLS running? Reinstall/restart connector · firewall |
| Push works but JSON fails | Matching mesh name · Status=OK · vertex count |
| Menu / tab missing | After EP01 install, fully quit and restart the DCC |
| Need support | Attach SLS Debug Report + logs from Open Log Folder |