Ep.16 — Init Dummy Template · 10-min First Pass
Download Markdown Download with Images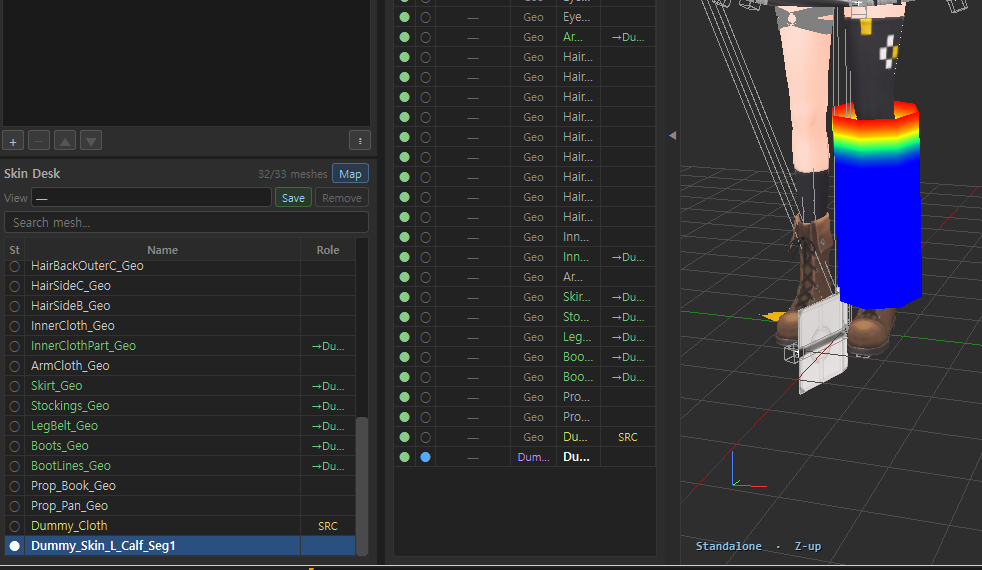
1. Why this episode
Hierarchy and Skin Archive can feel like a cockpit at first. Do we really need Layers? Does that just add more to manage? Those questions come up a lot.
SkinLayer Studio has been stacking Layer Weight so Dummy paint can move onto the real mesh and stay non-destructive.
This episode is the opening for Init Dummy Template. It is not EP13, where you build a Dummy from bones. Here you snap an already skinned Template Dummy onto the character bones and finish the first pass.
UI detail: F10 — Create Dummy · Transfer
2. How much faster
The opening is a 20× time-attack. Full Body plus fingers, first pass, lands near 10 minutes. Detail still needs polish.
| Who | First pass without Template | Init Dummy Template | Speed |
|---|---|---|---|
| Senior (this video) | about 150 min (2h 30) | about 10 min | about 15× |
| Animator · junior | about 240–300 min | about 10 min | about 24–30× |
After 150 minutes you are usually tired. With the Template, the same first pass finishes without that fatigue.
3. Opening demo — Apply
The example is an unskinned Dummy female character.
- Create → Apply Init Dummy
- If the spine has 3 bones, pick the spine_seg3 Dummy.
- Match Pelvis · Spine 1 · 2 · 3, then Apply
- Then Create → Apply Arm (three-bone leg)
- Check that bones stored in the Init Dummy match the scene, then Apply
- Scale the Dummy foot · toes to Match
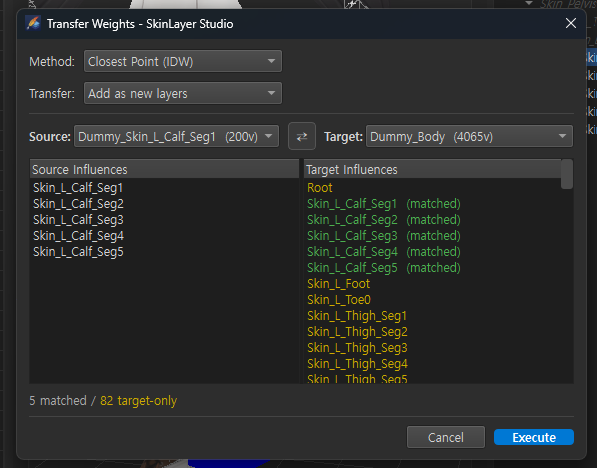
- Commit Mesh → Transfer Weight
- If needed, Execute Skin Copy Paste, then Transfer again
- Hide the Dummy. Select Body to see the torso Dummy.
- Clean leftover weight, then Mirror
- Move Thigh · Calf to check
Torso + legs finish in a few minutes. How to build your own Init Dummy: EP17. This episode starts at Apply.
4. How it works — Snap
For a leg:
- Pick the leg on the Template. It already holds a full Weight set.
- Skinned bone names differ by scene. Match them exactly.
- Bones inside the Init Dummy Snap to the target bones.
- That alone usually gets Dummy-to-mesh Match around 80–90%.
- Fit the rest with Fit Dummy.
- At 95–100% Match, move weights with Copy Paste · Transfer Weight.
5. Template · Custom
Open Init Dummy and you get Template and Custom. Custom is where you save your own.
Example: 3ds Max Arm
- Duplicate as to Custom — copies into the Custom folder
- Rename (e.g. My Arm Sec)
- Open File to inspect the setup
The Arm Template includes extra padding mesh for the Clavicle Mask. After transfer that data is cleared and you start from here. Upper Arm · Forearm · Hand are already clean. No fingers — fingers are a separate Module. → EP07
A new sort feature helps keep Layers tidy.
6. A-pose Dummy → T-pose Snap
The Dummy character may stand in a T-pose while the arm Template Dummy is an A-pose. Snap maps that direction onto the target Arm.
- In Create, pick your saved My Arm and Apply
- Match bones such as Clavicle. You can assign target bones yourself.
- Auto Find is usually available.
- If the Template wants Spine 3 but the scene only has Spine 2, both sit at the rib cage. Pick the closest chest bone (e.g. Spine 2).
- On Apply, A-pose bones Snap to T-pose. Shoulder · elbow line up; the hand can be a bit off and still transfer.
7. Fit Dummy · Commit
Apply turns on Fit Dummy mode. Bones show in purple.
- Move Init Dummy bones temporarily to match Dummy shape — like modeling the Shape.
- Follow makes them stick. Turn it off (No Follow) to overwrite Scale only, e.g. on fingers.
- Adjust the rib cage in Fit Dummy too. It does not have to be perfect.
- When done, Commit Mesh. You can still refine after that.
- Then Transfer Weight. You can delete the Dummy. Real Weight lives on the character mesh.
Layers are already in the Template, so edits are fast. Example: Clavicle too strong → Multiply 0.95, ease the armpit, Smooth. First pass, still non-destructive.
8. Layers vs AI one-click
AI and full-body automation can be fast at the start. The real difference is whether Layer data remains.
One-click weight is fine for a first dump, but there is no Layer structure a person can edit. You cannot safely widen a leg range, and Twist · Balance are hard to keep while you fix.
Init Dummy Template gets close to one-click speed and still keeps Layers. Quality comes from the saved Template. Raise the Template and production quality rises with it. The same idea can grow to Facial (lips · eyelids) and cloth · skirt hems.
Duplicate a bundled Template to Custom and tune Weight to your taste. Right-click the mesh → Set Type = Init Dummy → Save to land it on the Custom tab. How to build one: EP17.
9. Why Parts, not Full Body
Characters do not share one shape. Four or six arms, reverse-joint legs, SD hands with three fingers. Modules are how you cover those cases.
You can store a Full Body in Custom. It is not recommended. Apply can explode the bone count to 50 · 70 · 100. Add one part at a time, then Transfer Weight.
One-line flow
Create → Apply Init Dummy (Template or Custom)
  → Match bones (Auto Find · Spine nearest the rib cage)
  → Snap (A-pose → T-pose is fine)
  → Fit Dummy for shape · Commit Mesh
  → Transfer Weight · (Copy Paste) · Mirror
  → Multiply · Smooth on Layers
  → Hide / delete Dummy
Request the trial on the site and test it against your Production and Pipeline.
Contact: contact@otakusolutions.com