F01 — Layout Overview (Numbers 1–8)
Download Markdown Download with ImagesSkinLayer Studio 1.3.x Standalone UI reference.
Practice: EP00–EP12 · Features: F01–F17 (order 50+).For new users. Color number badges (1–8) match the table below.
For hands-on practice, see practice EP03 Overview.
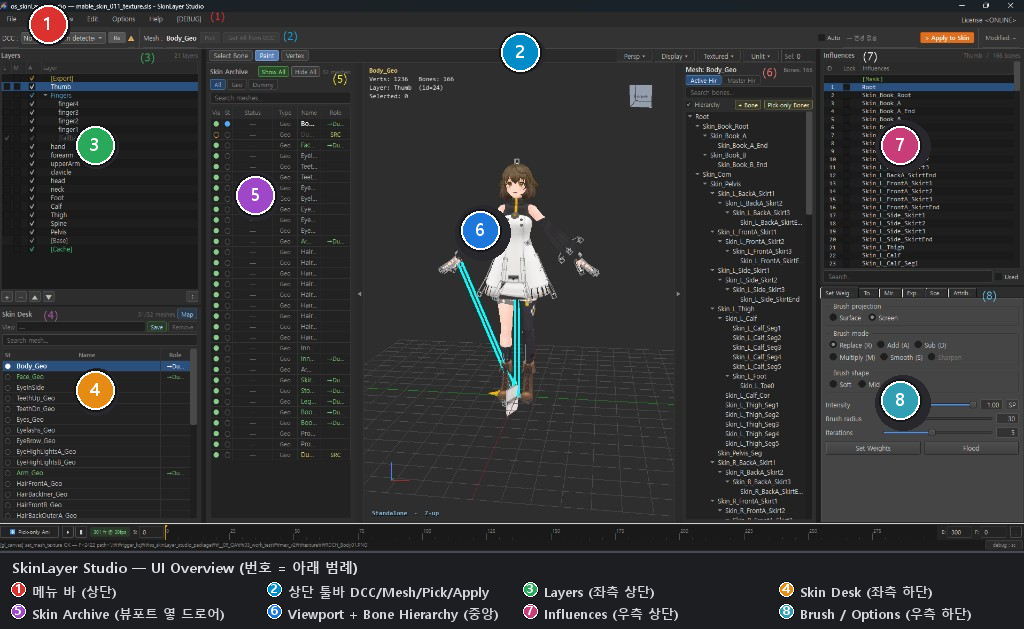
Zone map at a glance (drawers open)
This capture shows Skin Archive (left) and Bone Hierarchy (right) open.
The badges on the image and the legend 1–8 match the table below.
| # | Zone | Location | One-line description |
|---|---|---|---|
| 1 | Menu bar | Top | File · Tools · View · Edit · Options · Help → Details |
| 2 | Top toolbar | Just under the menu | DCC session · Mesh · Pick / Get All · Apply to Skin |
| 3 | Layers | Upper left | Skin layer tree → Details |
| 4 | Skin Desk | Lower left | Loaded mesh list · Sync → Details |
| 5 | Skin Archive | Viewport left drawer | Vis / Type / Name / Role → Details |
| 6 | Viewport + Hierarchy | Center | Mode bar · 3D view · Bone Hierarchy drawer → Viewport · Hierarchy |
| 7 | Influences | Upper right | Bones (influences) on the active layer → Details |
| 8 | Brush / Options | Lower right | Set Weights · Mirror · Export… → Details |
This capture has no numbers for them, but the bottom of the screen also has Timeline (animation scrub) and the status bar (messages).
→ Timeline · Animation
Numbered explanations
1 — Menu bar
Horizontal menu at the very top of the window.
| Menu | Role |
|---|---|
| File | New/Open/Save · Load Animation · Import/Export FBX |
| Tools | Transfer Weights · Normalize/Prune · Export/Import JSON |
| View | Wireframe · Bones · Sync Map · Frame Fit |
| Edit | Undo/Redo · Select · Texture Manager |
| Options | Settings · Language |
| Help | About · Updates · Guide |
| [DEBUG] | For development (ignore for normal use) |
2 — Top toolbar (DCC · Mesh · Apply)
One row just under the menu.
| UI | Role |
|---|---|
| DCC | Session connection status (e.g. 3ds Max) |
| Mesh | Current active mesh (e.g. Body_Geo) |
| Pick / Get All | Pull mesh · skin from DCC |
| Apply to Skin (orange) | Push edited weights to DCC/skin |
Pick
Pulls one selected DCC mesh (geometry · skin · bones) into Studio.
Use for first load, or after a large skin change in Max.
If only 1–2 bones were added, Hierarchy + Bone is lighter than Pick.
Get All
When you have Body/Face/clothing meshes, bring several from the list at once
instead of picking one by one.
Apply to Skin
Studio edits do not auto-push to DCC. Push with the orange button when ready.
Offline / other PC → JSON or FBX.
After painting and layer edits, you usually finish with Apply to Skin.
3 — Layers
Upper left. Manage weights stacked as layers.
- Examples:
[Export],Base,Thumb,Fingers/ finger1… - Columns L / M / A · groups · system layers
- The layer you pick here ↔ 7 Influences · viewport Active Layer
4 — Skin Desk
Lower left. Mesh workbench for meshes loaded in the session.
- Examples: Body_Geo, Face_Geo, EyeInSide…
- Status / Name / Role · search · Map (Sync Map)
- Sync Source / Target · enter Transfer
5 — Skin Archive (left drawer)
Panel that slides in from the left of the viewport.
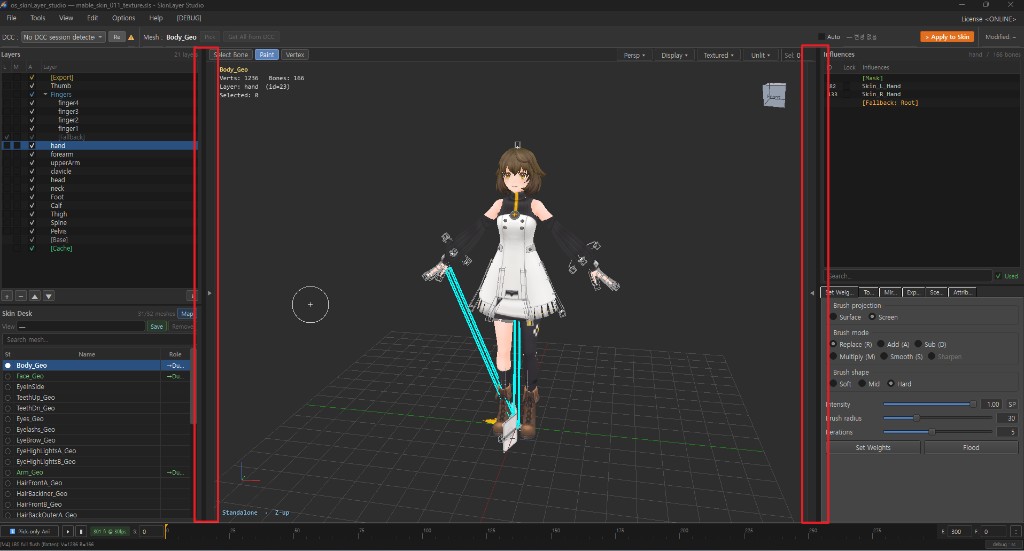
(If closed, click the vertical handle between Layers/Skin Desk and Viewport.)
| Column | Meaning |
|---|---|
| Vis | Visibility |
| St / Status | Status |
| Type | Geo / Dummy |
| Name | Mesh name |
| Role | Sync role such as SRC · →Du… |
6 — Viewport + Bone Hierarchy
The full center workspace.
| Part | Description |
|---|---|
| Top mode bar | Select Bone / Paint / Vertex · Persp · Display · Textured · Unlit |
| 3D Viewport | Mesh · bones · paint · select |
| Right Hierarchy | Active Hier / Master Hier · + Bone · Pick-only Bones |
Hierarchy is also a drawer. If closed, open it with the vertical handle between Viewport and Influences.
→ Viewport menu bar · Bone Hierarchy
7 — Influences
Upper right. Bone list bound to the active layer.
- ID · Lock · bone name ·
[Mask]·[Fallback] - Choose paint target bone · Used filter · right-click Copy/Cut Weight
8 — Brush / Options (Tools panel)
Lower right. Brush and tool tabs.
| Tab examples | Contents |
|---|---|
| Set Weights | Projection · Mode · Shape · Intensity · Radius · Set Weights / Flood |
| Tools / Mirror / Export / Scene / Attribute | Fallback · Mirror · Skin Limit · display · Dummy attributes |
Drawer handles (open 5 · Hierarchy in 6)
| Handle | Location | Opens |
|---|---|---|
| Left | Between 4 Skin Desk / 3 Layers ↔ 6 Viewport | 5 Skin Archive |
| Right | Between 6 Viewport ↔ 7 Influences | Bone Hierarchy (inside zone 6) |
Short click = toggle · drag left/right = resize width.
Recommended eye flow
2 DCC connect → Pick / Get All
→ Select mesh in 4 Skin Desk
→ Select layer in 3 Layers
→ 6 Paint mode · pick bone in Hierarchy / 7 Influences
→ Paint with 8 brush
→ (Check pose on bottom Timeline)
→ 2 Apply to Skin
Related docs
| Doc | Contents |
|---|---|
| Menu bar | File · Tools · View · Edit · Options · Help |
| Layers panel details | L/M/A · right-click |
| Skin Desk · Sync Map | Mesh · Sync · Map |
| Skin Archive details | Vis/Type/Role |
| Bone Hierarchy details | Active/Master · + Bone |
| Influences details | Lock · Mask · right-click |
| Tools panel details | Set Weights ~ Attribute |
| Viewport menu bar | Persp · Display · Lit/Unlit |
| Timeline · Animation | Bottom Timeline · Save/Load |
| Create Dummy · Transfer | Dummy → Transfer |
| Transfer Weights | Tools menu Transfer |
| Export JSON | JSON · Max connector |
| FBX | Import/Export · Pick alternative |
| Options | Settings · Language |
| Texture Manager | Edit → Texture Manager |
| Practice EP03 Overview | Hands-on practice |
| Series table of contents | All EPs |
Reference capture: drawers open · numbers 1–8 · 2026-07-26
Image: assets/ui_overview_numbered_drawers.png